


 for a free one-page illustrated step-by-step procedural diagram about draining a drum drip on a dry fire sprinkler system in PDF format, please click the image above |
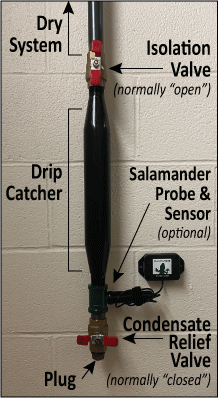
| To get familiar with this part of your Dry Fire Sprinkler system, the parts of a drum drip are labelled on the diagram to the right. An operational drum drip collecting condensation from the dry system should look like the picture above to the right: ✓ Isolation Valve in “open” position ✓ Condensate Relief Valve in “closed” position ✓ Plug in bottom of Condensate Relief Valve |
 |
| STEP #1: Slowly close the top isolation valve. This will isolate this drum drip from the rest of the air-pressurized system. Failure to do so may result in a de-pressurizing (discharge) from the main system! |
 |
| STEP #2: Now that the drum drip is isolated from the system, remove the bottom plug from the condensate relief valve to allow water to drain through the bottom valve from the drip catcher. |
 |
| STEP #3: Slowly open the bottom condensate relief valve to allow the water to purge from the drum drip. Because the chamber will be pressurized, it may be prudent to use a receptacle to collect the discharged water. It is not uncommon to hear, see or feel a release of air as the valve is opened. |
 |
| STEP #4: To restore the drum drip back to its purpose of collecting condensation, follow the first three steps in reverse, as follows: 4.1. Close the bottom condensate relief valve. This will the pressure within the dry ire protection system. 4.2. Only after the bottom condensate relief valve is closed, slowly open the top isolation valve. This will reincorporate the drum drip into the rest of the system. 4.3. Install the bottom condensate relief valve plug |
 |
| repeat the steps above until all of the water has been successfully drained from the drum drip. |